Emily Warford Ivey
  • Home
  • Bio
  • Dogs
  • Cats
  • People
  • Birds
  • Misc Gallery
  • Fabric
  • Pricing
  • BLOG

Handpainted Wooden Truck

3/16/2013

 
Picture
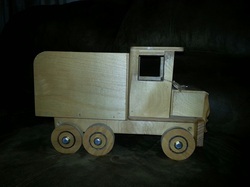
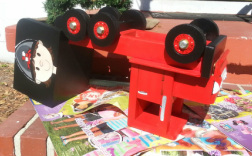
As part of this years "Spring Eggstravaganza" at the First Baptist Junior Academy of Jacksonville, businesses and parents alike have donated an amazing array of baskets and items for one of the years biggest fundraisers. I offered my services on several of the projects and the latest one I've completed is what I will show you today! One of our parents has a uncle that makes the MOST adorable wooden toys and furniture and I was given the raw wood items to personalize for the event. If you are interested in supporting this wonderful school, please follow the links to find out how you can purchase tickets to the event, which takes place on April 5, 2013 from 6-8 pm and includes a fabulous catered mean from Buca di Beppo .

Spring Eggstravaganza Tickets
Picture
Make sure you spray the finished item OUTSIDE!
Now you have the finished truck! This specific item will be up for auction at the FBJA Spring Eggstravaganza along with much, MUCH more! Get your tickets and we'll see you at the auction!

Painting the Truck

    The craftmanship of this truck is phenomenal and I will be returning to edit this blog when I have his information to share. The steps to painting the truck were as follows:
~Use acrylic paint and brushes. Acrylic paint is great because it is durable and washes up with water. Watch out though it will stain your clothes!
~Avoid painting gears, hinges and metal parts for two reasons (1) Trucks hate it when paint gunks up their gears...it makes it harder for their wheels to turn and (2) acrylic paint isn't wild about sticking to metal either, especially on a toy that will bump or crash into things. It would eventually peel off and not look very nice.
~Make sure you do paint all the surfaces that you will be able to see! I painted the bottom because I have a son with about a hundred toy cars and I think I see them upside down more than right-side up. Ha!
~decorate your truck! I have used the school mascot and colors to embellish mine! To make the truck look a little more vintage, I used a darker coat of red for the base coats and then used the brighter red on the top layer.
~ SEAL IT! The final step of the process is to cover the truck with a sealant. I used a spray, but there are also paintable ones out there. I like the spray because it is easier to get an even coat. Remember to let the truck dry between coats and turn it over to get the bottom too! Below is a photo of the product I used:
Picture

Comments are closed.

    Emily Ivey

    I am always looking for new and unique projects to entertain myself (and my two children) as well as expand and diversify my portfolio and skills! Here is where I share what I have been doing and all of my "Pet Projects!" Thanks for stopping by!  

    Archives

    February 2015
    September 2014
    May 2014
    April 2014
    March 2014
    January 2014
    November 2013
    October 2013
    September 2013
    August 2013
    March 2013
    February 2013

    Categories

    All

    RSS Feed

Powered by Create your own unique website with customizable templates.
Photos used under Creative Commons from flattop341, BANAMINE
  • Home
  • Bio
  • Dogs
  • Cats
  • People
  • Birds
  • Misc Gallery
  • Fabric
  • Pricing
  • BLOG